Create Templates Directory: First, ensure that you have a “Templates” directory in your home folder. If it doesn’t exist, you can create it by opening a terminal and running the following command: mkdir ~/Templates
Create a New Document Template: Within the Templates directory, create a new empty file named “New Document”. You can do this via the terminal with the following command: touch ~/Templates/"New Document" This command creates an empty file named “New Document” within the Templates directory.
Restart GNOME Shell: Sometimes, restarting GNOME Shell can help apply changes. Press Alt+F2, type r, and press Enter to restart the GNOME Shell.
Verify: Right-click on the desktop or within a file manager window. You should now see the “New Document” option in the context menu under “Create Document” or a similar category.
By following these steps, you should be able to add the “New Document” option back to the right-click menu in Ubuntu 22.04, providing you with a quick way to create new empty files.
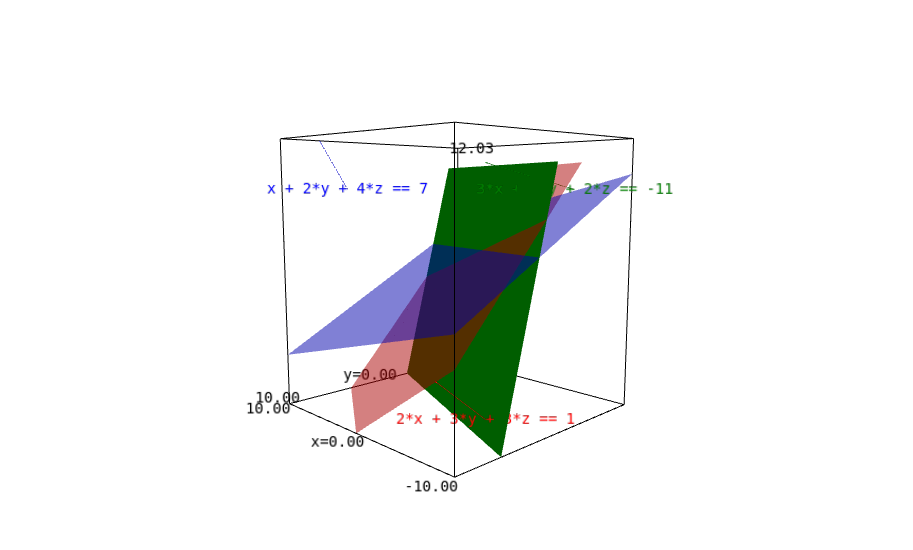
Three variables x, y, and z are defined symbolically using the var function. These variables represent the coordinates in three-dimensional space.
Equation Definition:
Three equations representing planes are defined:
eq1: x + 2y + 4z = 7
eq2: 3x+7y+2z=-11
eq3: 2x+3y+3z=1
Plotting the Planes:
Each equation is plotted in a different color with the implicit_plot3d function. The color parameter specifies the color of the plane, and the opacity parameter sets the transparency level. In this case, each plane is set to have a transparency of 0.5, making them partially see-through.
Labeling the Planes:
Each plane is labeled with its equation using the text3d function. The labels are positioned at specific coordinates in the three-dimensional space to avoid overlap.
Adding Arrows:
Arrows representing the direction of the normal vectors to each plane are added. The direction of each arrow corresponds to the coefficients of the normal vectors derived from the equations.
Displaying the Plot:
All the components (planes, labels, and arrows) are combined using the + operator and displayed using the show function.
Overall, the code generates a 3D plot showing three planes with transparency applied to each plane separately, along with labels indicating their equations and arrows indicating the direction of their normal vectors.
Define variables
x, y, z = var('x,y,z')
Define equations
eq1 = x + 2y + 4z == 7
eq2 = 3x + 7y + 2z == -11
eq3 = 2x + 3y + 3z == 1
Plot each plane in a different color with transparency and label them
In this tutorial we will create new images using Python’s PIL library.
Creating new image in PIL can be compared to creating new layers in photo editor’s such as GIMP or Adobe Photoshop. In most cases new image is created to create alpha transparency layer, edit the dimensions of an existing image, create a color tint, create text, draw on an image and/or blend combine multiple image layers in one image.
In addition to simple new image creating operations with PIL library we will also look at some of the finer details such as creating new images with color or transparency.
Let’s first import the PIL library in Python and start with some simple operations.
.Image.new method
After importing PIL library’s Image module, we can create an image straight away.
from PIL import Image
You’ll have to pass two arguments minimum by default. These are:
mode: common image color modes are RGB and RGBA. Feel free to check out this extensive tutorial for a detailed explanation of all color modes in Python’s PIL library.
size: finally image size is another parameter that’s needed. You can go for the same size as an existing image you’re working on or some custom or standard sizes such as: (300, 300) or (1920, 1080)
Example 1: How to create new image
Let’s create a new image with transparency channel. It will have to be in RGBA mode which includes A (alpha) channel for transparency compared to RGB mode which doesn’t have transparency option.
Keep in mind though, while RGB works with common image file formats such as jpg RGBA only works with some special image formats like png.
from PIL import Image

new = Image.new(mode="RGBA", size=(1920,1080))

new.show()
Creating new image with default color
As you can see, color defaults to black when not specified.
Alternatively, you can even omit parameter names mode and size as following as long as you follow the right order:
from PIL import Image

new = Image.new("RGBA", (1920,1080))

new.show()
Example 2: How to create new image with color name
We can use “color” parameter to create an image with a colored background.
Check out the following Python code example:
from PIL import Image

new = Image.new(mode="RGBA", size=(1920,1080), color="pink")

new.show()
Creating new image with pink color
Example 3: How to create new image with RGB color
Although using color names is practical and works perfectly fine, you might want to use more specific color for your new image. In this example, let’s create an image in RGBA mode and specify a bluish color with approximately 50% transparency.
A bluish color can be created with a high value for B band of the RGBA channels. We’ll also use 127 for the A band which is roughly half of the full value 255.
Check out the following Python code example:
from PIL import Image

new = Image.new(mode="RGBA", size=(1920,1080), color=(10,10,255,127))

new.show()
Creating new image with RGBA and transparency
Although blue band is completely maximized we get a purple shade since transparency is at 50%.
Example 4: How to create new image with hex color
That’s not it yet. Python PIL has more tricks up its sleeves. You can also use specific hex color codes to create new images with very specific colors.
You can find a hex code of a color from free online color converters or color palette features of the photo editing applications such as GIMP.
Creating new image with RGBA and transparency
Here, this dark blue is created with hex code: #00004c
from PIL import Image

new = Image.new(mode="RGB", size=(1920,1080), color='#00004c')

new.show()
In Ubuntu Older versions, the SageMath notebook could be opened by typing “sage notebook()” in the terminal, but In the latest version of Ubuntu (say, 21.04), SageMath is using “Jupiter Notebook” instead of Notebook.
In order to open Jupyter Notebook in SageMath, you have to open the terminal (Alt+Ctrl+T) and write jupyter notebook then press enter.
If we put for each combination of 6 scientists a lock, then that’s (choose 6 from 11)=462 locks. Now so that the locks can be opened if 6 scientists are there, every scientist needs at least the keys for every combination of scientists that includes him. Thats’s (choose 5 from 10)=252 keys. To assure that the locks can’t be opened if less scientists are there, we give them no more than the 252 keys that they need.
We can easily mirror the contents of a PDF file. When printing in booklet format in the press, you have to mirror the PDF page while printing. We can do the mirroring using the following command line
CSIR UGC NET Previous Math Question Papers with Answer Keys
Joint CSIR-UGC NET exam
The CSIR is the Council of Scientific and Industrial Research conducting the Joint CSIR-UGC NET exam twice a year. Now currently, National Testing Agency( NTA) conducts CSIR NET Exam twice a year in June and December. The CSIR NET exam is to be held for determining the eligibility of the candidates for the award of JRF (Junior Research Fellowships) NET and also for providing eligibility for the appointment of Lecturers (NET) in certain subject areas such as Chemical Sciences, Earth Sciences, Life Sciences, Mathematical Sciences, and Physical Sciences.
Joint CSIR UGC NET exam pattern
The Joint CSIR-UGC NET exam pattern for the Single Paper MCQ (Multiple Choice Question)test contains:- The maximum marks for the exam is 200. The time duration of the exam is 3 hours. Three parts are there in the question paper.
Part ‘A’ is common to all subjects. This part A may contain a maximum of 20 questions of General Aptitude. The candidates are requested to answer any 15 questions from the 20 questions. Two marks are to be awarded for each question. The total marks for Part ‘A’ are 30 (out of 200).
Part ‘B’ may contain subject-related MCQs. The total marks to be allocated to this part will be 70 (out of 200). The candidates are requested to answer any 35 questions from the 40 questions. Two marks will be for each question.
Part ‘C‘ may contain deep questions to test the candidate’s knowledge of scientific concepts and/or application of the scientific concepts. The candidates are requested to answer any 25 questions from the 60 questions. The total marks to be allocated to this part will be 100 (out of 200). Four marks are to be awarded for each question.
* Negative mark will be 25% for each wrong answer.
CSIR UGC NET Previous Question Papers with Answer Keys Archives
QPDF is SUPER excellent PDF command line utality for Linux !!! It is SUPER excellent tool, being very powerful, able to perform highly difficult & specific operations on PDF files ……. .QPDF is a program that can be used to linearize (web-optimize), encrypt (password-protect), decrypt, and inspect PDF files from the command-line.
Install qpdf by entering the following commands in the terminal:
sudo apt update
sudo apt install qpdf
General syntax to encrypt pdf
To encrypt PDF file:
qpdf --encrypt user-password owner-password key-length [restrictions] -- inputfile.pdf outputfile.pdf
The User password, or sometimes called the “open” password is used to open a PDF file if a password is set. The other password, the Owner password, is used to set what users can do with the PDF. It controls things like if a user is allowed to print, copy or modify a PDF. Either or both of the user password and the owner password may be empty strings. The value for key-length may be 40, 128, or 256. When no additional restrictions are given, the default is to be fully permissive.
Using your current settings, the pdfpages inserts the pages of an external PDF file as full page additions to your existing document. That is, the external file page setup is copied to the “main” output PDF on a page-by-page basis. The “main” file’s page setup (including header/footer) is ignored.
If you wish to include the same header/footer style of your main document for each of the \includepdf pages, then you need to specify this using the pagecommand key-value.
Example:
\documentclass[headheight=1.2cm,headsepline,twoside]{scrartcl}
\usepackage[left=0.5in, right=0.5in,top=1in, bottom=2.8cm,footskip=18mm]{geometry}

\usepackage{hyperref}
\hypersetup{
    colorlinks=true, %set true if you want colored links
    linktoc=all,     %set to all if you want both sections and subsections linked
    linkcolor=blue,  %choose some color if you want links to stand out
}


\usepackage{tabularx}
\usepackage[headsepline]{scrpage2}
\usepackage{lipsum}
\usepackage{pdfpages}
\usepackage[english]{babel}

\pagestyle{scrheadings}
\chead[]{Center header}
\ihead[]{Inside header}
\ohead[]{Outside header}
\cfoot[]{Center footer -- \thepage{} --}
\ifoot[]{Inside footer}
\ofoot[]{Outside footer}

% Easy interface
%\deftripstyle{pdfincl}
%  {}
%  {And a center header}
%  {}
%  {Another inside footer}
%  {}
%  {Another outside footer}

% Expert interface
\newpagestyle{pdfincl}
 {% HEADER
  (0pt,0pt)% no above rule
  {% header, even pages
   \hfil And a center header\hfil
  }
  {% header, odd pages
   \hfil And a center header\hfil
  }
  {% header, single side
   \hfil And a center header\hfil
  }
  %(\textwidth,0.4pt)% rule below header
  (0pt,0pt)% no above rule
 }
 {% FOOTER
  (0pt,0pt)% no separation rule
  {% footer, even pages
   Another outside footer\hfil Another inside footer
  }
  {% footer, odd pages
  \begin{tabularx}{\textwidth}{|l|>{\centering\arraybackslash} X|r|}\hline
     Another inside footer &  Another outside footer & \hfill Page no.\thepage \\ \hline
  \end{tabularx}%
  }
  {% footer, single side
   Another inside footer\hfil Another outside footer
  }
  (0pt,0pt)% no rule below footer
 }


\AtBeginDocument{\renewcommand\contentsname{Table of Contents}}% Custom name of TOC
\begin{document}

\title{Title of the Your Contents Here}
\author{Md Kutubuddin Sardar}
\date{\today}

\maketitle
\tableofcontents
%\section{Section Name}
%\section{Blah}
%\lipsum[3-5]

\includepdf[addtotoc={1, section, 1, Included PDF,tag},
    turn=false,scale=0.9,pages=-,
    pagecommand={\thispagestyle{pdfincl}}]{preposition}
%\includepdf[addtotoc={1, subsection, 1, Included PDF,tag}, turn=false,frame,scale=0.9,pages=-,pagecommand={\thispagestyle{pdfincl}}]{preposition}
%\section{Section Name}
%\lipsum[3-5]
\end{document}